9 min read
Spruce


How to write a check: A step-by-step guide
9 min read
Spruce
At-a-Glance:
- You can write a check by filling out specific fields including the date, payee name, numerical and written dollar amounts, memo, and your signature.
- A check does not withdraw money from your account until it is cashed or deposited, which the recipient may do immediately or weeks later.
- If a check is deposited and your account lacks sufficient funds, the check will bounce, potentially resulting in fees and inconvenience for both parties.
In today’s digital world of tap cards, payment apps, and mobile payment services, writing a check may not be something you do frequently — or ever. And for many people, the idea of transferring cash by whipping out a checkbook and signing a piece of paper feels downright foreign, like tape decks, landlines, or TV before streaming.
That said, there may be times when writing a check is necessary. For instance, some landlords prefer that you use checks to make rent payments. Or you may use one to mail money, since it’s safer than mailing cash.

If you’re new to filling out a check, don’t worry — Spruce is here to help. Along with our helpful money management features, you can count on Spruce to guide you through the skills you need to take control of your finances.
Here’s the good news: Writing a check is straightforward once you understand the format. We’ll break it down for you step by step.
Check example
Before diving into how to write a check, first get acquainted with the different elements you’ll see. Here’s a check example.
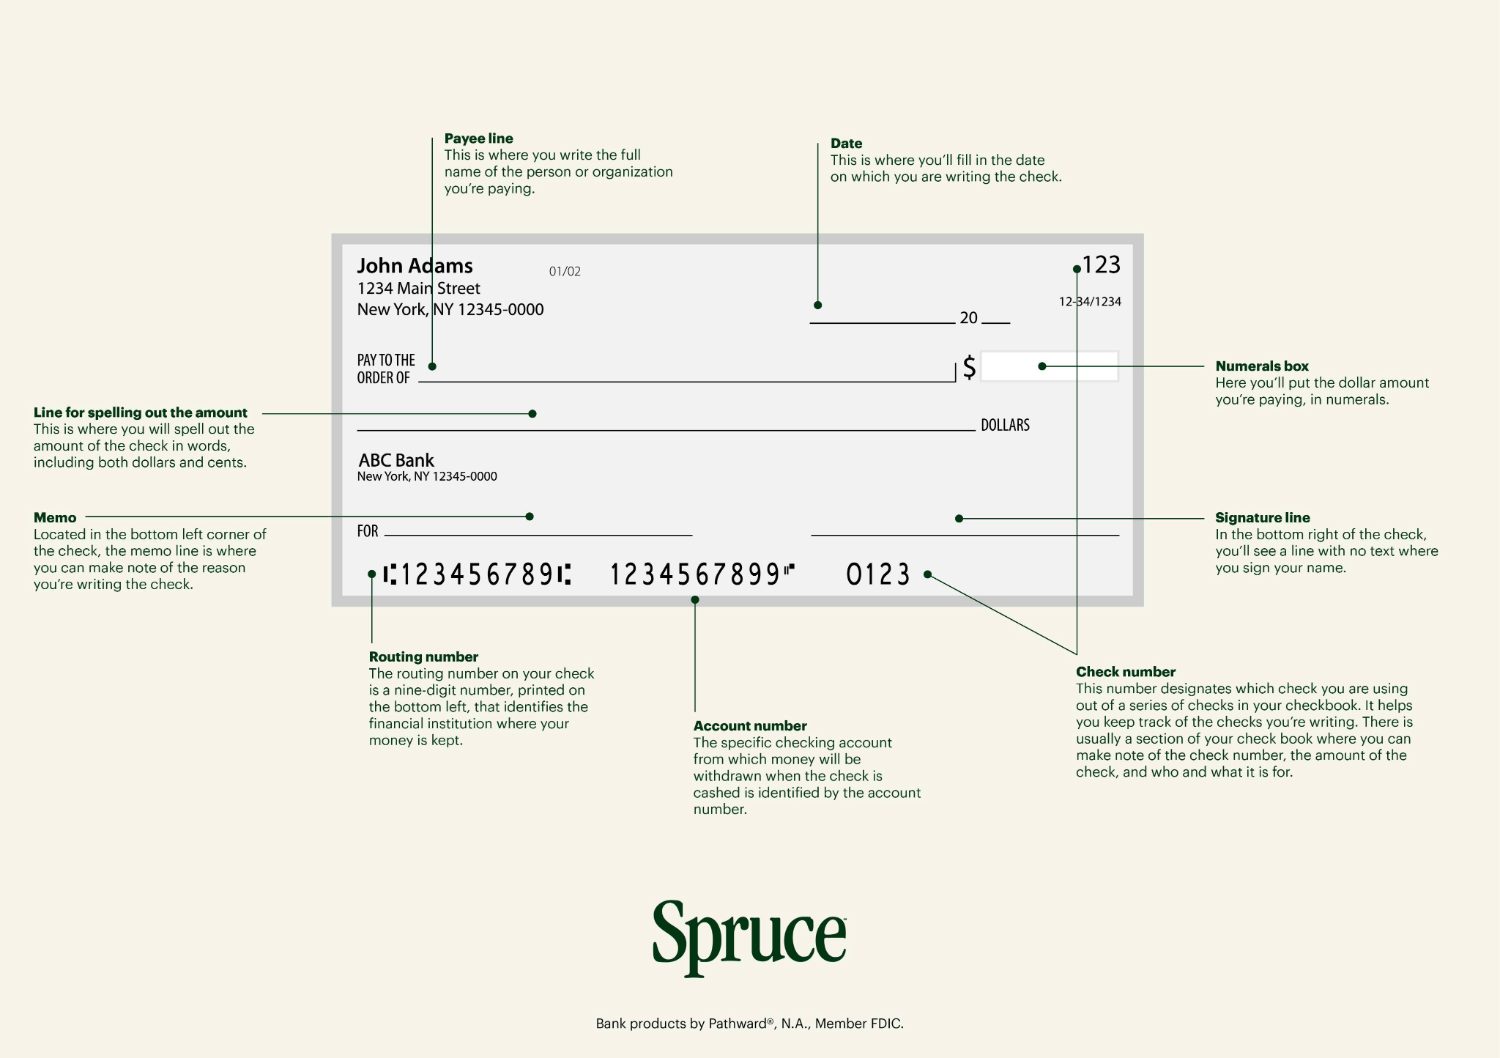
- Date: This is where you’ll fill in the date on which you are writing the check.
- Payee line: The beginning of the payee line says, “Pay to the order of.” This is where you write the full name of the person or organization you’re paying.
- Numerals box: Here you’ll put the dollar amount you’re paying, in numerals.
- Line for spelling out the amount: This is where you will spell out the amount of the check in words, including both dollars and cents.
- Memo: Located in the bottom left corner of the check, the memo line is where you can make note of the reason you’re writing the check.
- Signature line: In the bottom right of the check, you’ll see a line with no text where you sign your name.
- Routing number: The routing number on your check is a nine-digit number, printed on the bottom left, that identifies the financial institution where your money is kept.
- Account number: The specific checking account from which money will be withdrawn when the check is cashed is identified by the account number.
- Check number: This number designates which check you are using out of a series of checks in your checkbook. It helps you keep track of the checks you’re writing. There is usually a section of your check book where you can make note of the check number, the amount of the check, and who and what it is for.
How to fill out a check
Now that you know what a check looks like, let’s take a spin through filling one out. It’s easy once you get the hang of it.
- Start by filling out the date. You’ll find this in the upper right-hand corner of the check. Follow a month, date, and year format.
- Write who the check is for in the payee line. If you’re paying an individual, make sure you’ve spelled their name correctly. If it is an institution, check with the organization to find out how they prefer you fill out this line. It may require a specific legal name.
- Fill in the numerals box. Write the amount of money you are writing the check for in the numerals box. This is located to the right of the payee line and has the dollar sign ($) in front of it. For example, if you are writing a check for $300 you would put 300.00 in the box.
- Write out the dollar amount. On the next line, write out in words the amount of money the check is for. This section will always include a fraction that indicates cents, even if the dollar amount is a whole number.
For example, if the check is for $500, you’d write out “Five hundred dollars and 00/100 cents.” If the amount is $150.75, you’d write “One hundred fifty dollars and 75/100 cents.”
If the words do not take up the entire space, draw a straight line from the last word to the end of the space to prevent someone from altering the check after you’ve written it. - Jot down a memo. Use the memo section of the check to describe what the check is for, such as “rent,” “phone bill,” or “Happy Birthday!” Using this area isn’t required, but it’s a useful source of information for your own records and for the person receiving the check.
- Sign the check. Put your signature on the blank line at the bottom of the check, and you’re all set.
How to write a void check (aka voiding a check)
If you make a mistake while writing a check, you can void it, which will prevent it from being cashed or deposited.
To void a check, use a blue or black pen and write VOID in large letters across the check. While the check can no longer be cashed once voided, it still contains sensitive information like your routing number and account number. So, dispose of it by shredding it or ripping it into small pieces.
Writing a check: What happens next
You can deliver a check in person or send it in the mail. If mailing your check, opt for a security envelope. These have patterns inside that prevent someone from reading your sensitive information through the envelope.
How fast is money deducted after writing a check?
The money does not leave your account until the recipient cashes or deposits the check. Then it typically takes about two days before the money is deducted from your account.
But, heads up! The check recipient could deposit it the day they receive the check or weeks later. As soon as you write a check, it’s best to act as though the money is already gone so you don’t accidentally spend it twice. Keep the money in your account until the check clears and the funds are transferred.
If you have too little money in your account for the recipient to cash your check, the check will bounce — meaning the bank will send it back to you without paying it. This is a hassle for you and the recipient, and it can trigger penalty fees.
Alternatives to writing a check to get money sent faster
While checks still have their place, there are plenty of faster, more convenient ways to send money. You’re probably using some of these, but as digital options evolve so does money management. Whether you’re paying a friend back for dinner or covering your monthly bills, here are some modern alternatives to consider:
- Online bill pay through your bank – Most banks offer free online bill pay services that let you schedule one-time or recurring payments directly from your account.
- Peer-to-peer payment apps – There are several apps that make it easy to send money to friends and family in seconds — no checkbook required.
- Money transfer services – Services like Western Union® or MoneyGram® allow you to send money domestically or internationally, often with cash pickup options.
- Digital wallets – Platforms like Apple Pay®, Google Pay™, and Samsung Pay® let you make purchases using your smartphone or smartwatch.
Each of these options offers different benefits, from speed and convenience to added security.
Get access to checks and more with Spruce
Spruce is much more than a saving and spending account. Find out all the ways you can use Spruce to move your money—without ever having to write a check. No stamps, envelopes, or waiting for a check to clear.
- Debit card – You can use your Spruce debit card anywhere Mastercard® is accepted.
- Digital wallet – If you don’t have your Spruce card handy, you can always use Spruce via your digital wallet on your phone.
- Recurring payments – Got recurring payments such as streaming services or utility bills? You can update your bills and subscriptions to be paid using Spruce, all from one place in the app.
Spruce also has paper checks – You can purchase a book of 25 checks that accesses your Spending account for a fee of $15.
Other ways Spruce can help you with money management
With Spruce, you can purchase checks for your spending account. And with other money management tools, Spruce can help you get better with money.
What do these tools look like? We’re glad you asked!
- Create saving goals and automatically set money aside for an emergency fund or big purchase. And as you tuck away money, you can earn 3.50% APY on the money you put in your saving goals.
- Use our automatic budgeting tracker to see where your money is going.
- Easily set up direct deposit.
- Access over 55,000 fee-free ATMs nationwide
- Get paid up to 2 days early
And one of the best parts? Spruce has no sign-up fees, no monthly fees, and no minimum balance requirements.
Start an account with Spruce today
Spruce is here to help you develop better money management habits. With tools like savings goals and automatic budgeting, you’ll be well on your way to getting better with money each day.
Get started with Spruce today!
This information is provided for general educational purposes only. It is not intended as specific financial planning advice as everyone’s financial situation is different.
Was this article helpful?

